Assessment for learning is at the core of great education, but getting reliable data in an expedited fashion can be a challenge in today's modern classroom and Google Forms provides solutions to all these challenges.

|
Assessment for learning is at the core of great education, but getting reliable data in an expedited fashion can be a challenge in today's modern classroom and Google Forms provides solutions to all these challenges.
We've been using Google Forms for years in class, and we love how easy it is to use and the powerful data that we get from each one. Whether it's a quick multiple choice question that reviews today's learning goal or an in depth constructed response question for critiquing a work of art, Google Forms gives us the fast and accurate formative data that we need to extend our learning and refine my instruction. We've used Google Forms to develop our critical thinking skills by critiquing visual art, but the same techniques can be applied to many different subjects including scientific observations, journal writing, and critiquing music, dance and theater just to name a few.
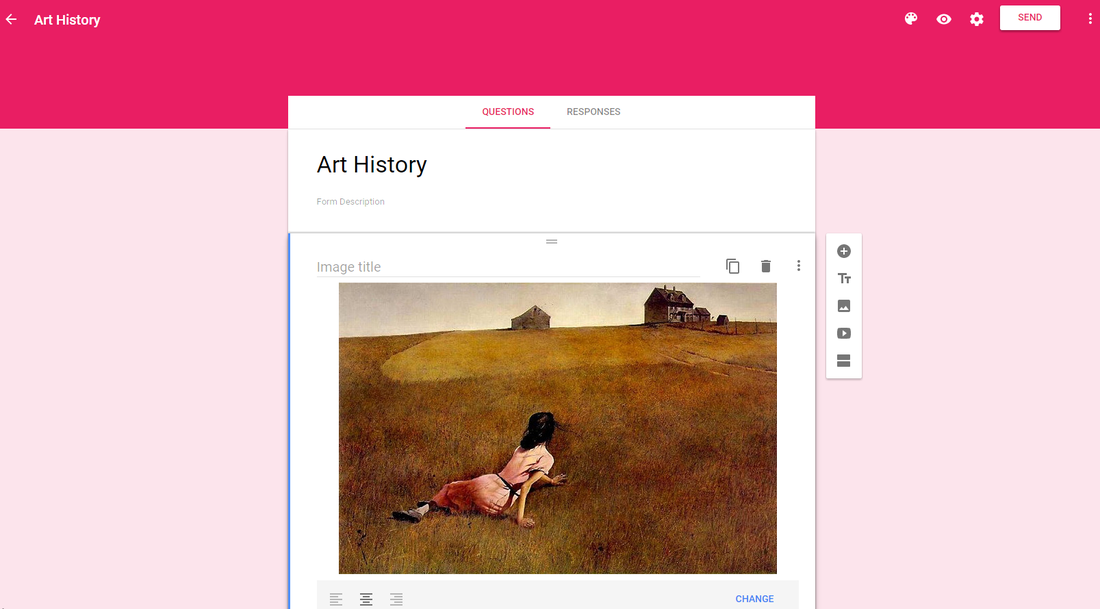
Google Forms is great for standard multiple answer or scale questions, but it's also wonderful for constructed responses like critiquing because it cultivates critical thinking and writing skills at the same time. Yes, we can't apply a quick auto grading tool like Flubaroo that will automatically grade it, but if we could we would lose a treasure trove of student's deeply personal and profound expressions. Google Forms also gives each student, no matter how shy they may be in our class, an equal voice. With Google Forms the time and effort to create one of these powerful tools is even easier. Ultimately, every time I open the critique feedback to see what my students have written in response to a work of art, I feel like I'm opening a door and looking into their imaginations. 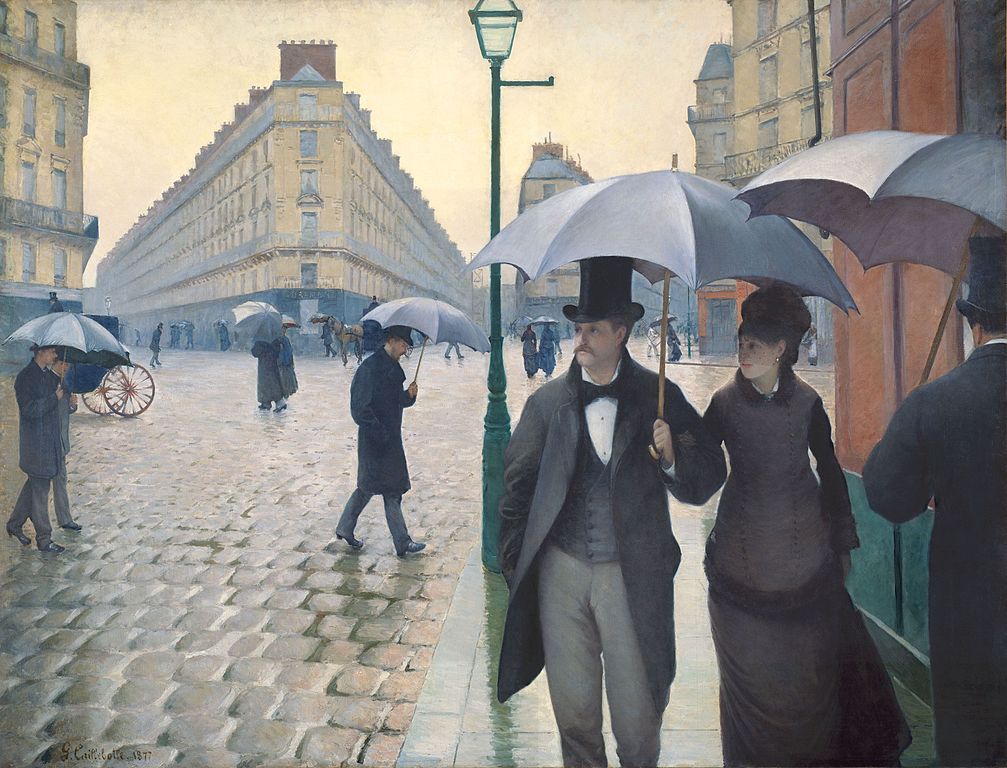
Click to enlarge
In looking at the image above by Gustave Caillebotte called Paris Street; Rainy Day, my 4th grade students made some very studious comments. Here are some examples of what they said, "The two main figures on the right side are looking off the picture, maybe they’re looking for someone? They’re looking for someone and they’re lost.", "The man alone in the middle is sad." and "The buildings are different, there are horses and they dress differently than us. I’d say this is a different city from a long time ago, probably the 1800's."
So how do we do this? We use the Google Form critique as an extension of our in class live critiques, thus students respond to the digital version with a familiar actual critique that has been modeled many times before in class. We learn that just a superficial observation isn't enough, in other words, just explaining the main subject in one sentence doesn't constitute a proper critique. Students are encouraged to first take at least a few minutes to analyze the work and specifically look for the details. After the initial observation students are asked to hypothesize what they believe is going on in the artwork. The best answers begin with the right questions. Use open questions like “What is going on in this picture?” or “What is happening with this artwork?” as opposed to limiting questions like “What is the artist saying with this work?” or “What is the meaning of this artwork?" With the live working model established we then begin augmenting our class critiques with the Google Form version. The following are some ideas and tips for using Google Forms to foster critical thinking with your students. 1. Make It Simple Google Forms has all sorts of great ways to assess learning, but we've found that instead of creating huge multiple question forms with several pages, it's actually much better to keep them to three questions. The first two questions are short answer items that ask "First Name" and "Last Name" along with a paragraph question that basically asks, "What is going on in this artwork?". Of course a good quality image needs to be used and if you need to adjust the image you can use Google Drawing which has quick and easy to use image editing functions. You can also insert more than one image to compare and contrast in a critique. Extra Tip: You can use the hover text option with an image to create a reminder for students to "Look for the details.", "Observe the whole picture.", etc. 2. Maximize the Settings Allow students to edit their responses and if appropriate, allow them to see a summary of responses by checking those boxes in the settings menu. You can also customize the confirmation page by adding a link that each respondent can click on when they finish the form. This link can access other Google Forms, link directly to the Google Art Project page that relates to that specific work, a video critique... the link possibilities are nearly endless. 3. My Art, Your Art, Our Art We just don't critique famous works of art, we also critique our own with Google Forms. Just today we were using Google Forms to critique our 3d printed projects. We used a form to ask what they liked about their print and how would they improve it. This technique draws a connection between the intense critical thinking we apply to historical works of art and our own. 4. Merging Other Google Goodies In the past I embedded all of our forms onto our class website, but since we started using Google Classroom last year I've been just throwing the form link in there. However, recently Google Classroom added the ability to incorporate Google Forms and mark them "done" when each student completes it- oh ya! It is well to note too that we've also been doing quick critiques using the integrated question feature in Google Classroom. Also, my students love using Google Cardboard, Google's amazing virtual reality kit, to discover art from around the world from the Great Pyramids to our very own nearby Nelson-Atkins Museum of Art. We've used photospheres and Google Street View in split screen mode to explore all over the globe. After exploring the art world we then record our critiques of our virtual field trip with a Google Form. The devices, apps, and teaching methods aren't important in and of themselves, they're only relevant if they help our students learn. Google Forms helps us go beyond the standard two second glance at art and dig deep into critical thinking skills that are necessary for every subject and every student. How important is critical thinking specifically for the visual arts? Critical thinking by critiquing art compromises four out of eleven of the National Core Arts Anchor Standards: Standard 7: Perceive and analyze artistic work. Standard 8: Interpret intent and meaning in artistic work. Standard 9: Apply criteria to evaluate artistic work. Standard 11: Relate artistic ideas and works with societal, cultural, and historical context to deepen understanding. Try it for yourself with the Google Form critique example below!
Wil Codilla is a public educator, speaker and trainer. @WilCodilla
 "Oh no. The internet is broke!" You see their eyes widen as they look down at their device, their mouth drops in confusion and they immediately start looking frantically for their teacher, you have a student that is lost in the digital world. Maybe it's a dropped internet connection, a forgotten username/password or a webpage that only partially loads, but whatever the cause the digital malady that results is many times the same- sheer panic. The following is a simple protocol that I've taught my students that has greatly increased our digital success and minimized our technology freak outs.
When something doesn't work as it should... 1. Try It Again, Three Times We've all had that weird glitch where we click on a button and nothing happens, then we click on it again, and voila, it suddenly works- like it's suppose to. I make it a point to teach them NOT to ask me the first time something doesn't work and that many times when something hiccups, it may not be your fault just stay cool and try a few more times. 2. Try Several Different Ways I teach them that sometimes the glitch is our fault, and sometimes it's the computer's. If it doesn't work one way try another. Are you clicking on the right link/button? Did you spell everything correctly? Do you have an internet connection? Teach your students to ask, "How else can I solve this problem?" 3. Ask a Neighbor I also teach my students that the answer you need for your technology woes could be as close as your fellow student sitting next to you. Instead of just teaching that my students should ask other students for help, I also teach them that they should be proactive in helping others that need it too. I share with them that they shouldn't just watch someone struggling, they are my co-teachers and they should help others as well. 4. Ask the Teacher Finally, if all else has failed, they can ask the teacher and we'll work until we get it fixed. Once I installed this digital routine I found that the instances of students getting to the point where they needed my assistance with their digital needs significantly decreased. Bonus: In Class Help Desk Employ those students that are already adept at technology as class tech helpers by establishing official tech support roles in your class. This can be manned on a rotational basis and give motivation to many students to develop their digital and collaborative skills. My class went from a near constant slew of hands being raised by students trying to remedy their digital conundrums to a class of empowered students not intimidated by technological problems. The best lesson my students learn beyond just fixing the occasional glitch is that they can persevere, devise multiple solutions for a problem and get help from their friends. Twitter: @WilCodilla 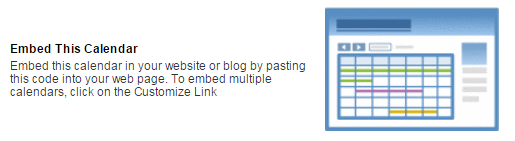 Embedding a Google calendar into a website is a great way to help keep your class on schedule and parents informed. The following are instructions to put your own calendar on a class website:
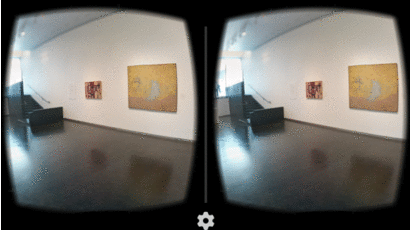
1. Open the Google Calendar app and click on the settings cog in the upper right hand corner and click on "Settings". 2. Click on the blue "Calendars" tab near the top. 3. Click on the blue name of the calendar you want to use under "My Calendars". 4. Scroll down to the "Embed This Calendar" section and copy the iframe code near the middle of the page. 5. Go to your web builder (where you edit your website) and embed the code into your website. I use Weebly for my webhosting so all I have to do is drag over an embed code widget and paste the iframe code into that space. Extra Tip: If you click on the blue "Customize color, size, and other options" link just above the iframe code it gives you more advanced features and a preview of what your calendar will look like. Wil Codilla is a professional artist, public educator and speaker. Twitter: @WilCodilla The impact of emerging affordable virtual reality kits like Google Cardboard is undeniable, and the amazing potential for this tool to be used in education is immense. Since I published a previous post about the adventures we’ve been having in our classroom with vr I’ve received a steady stream of people asking what vr apps we use in class. In this post I’ll outline free and easy to use apps that can be utilized with Google Cardboard in the classroom. 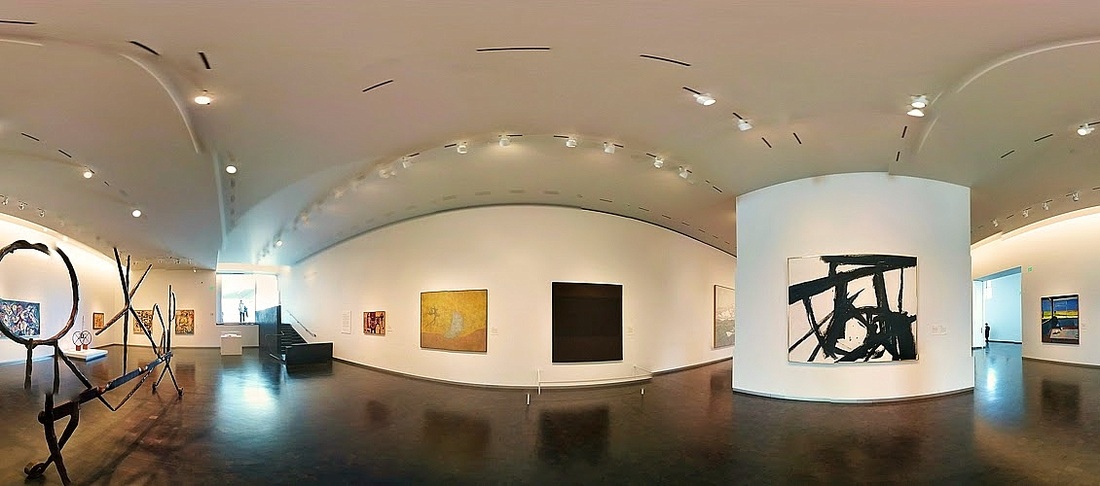 Photosphere of an art museum 1. DIY Photospheres We have increased the relevance of our learning and had a blast using our own photospheres in many different lessons. To get started making your own photospheres you must access a camera app that has a photosphere option such as Google Camera. Once you have taken the photospheres and saved them to your phone you can then access those photospheres in the Chrome Experiments app and navigate to the far right to find the photospheres option. To switch between the photospheres you may use the magnet slider button on the side.
For more about photospheres you can visit Google Map’s Photo Sphere site. A few quick tips that I’ve found useful when taking photospheres is to start with the least interesting area, so if the photo stitching isn’t exact once you complete the rotation it won’t distract from the focal point. Secondly, try to take photospheres when no one or just a few people are around, spectators can be very distracting to students. Next, make sure your photospheres are GPS tagged if you want to upload them to a site like Google Views which we’ll cover later in this post. 2. Google Maps Street View Google Maps Street View has torn down the walls of our classroom and made the entire world our learning environment. Recently one of my students was writing a logic branching ebook and needed more info about the Colosseum in Rome. 20 years ago I would have sent him to the library to find a few references, 10 years ago I would have had him Google it to find a few articles and 2D pictures, but now he used our Google Cardboard set to take his own virtual tour inside of the Colosseum- amazing! After searching for the place you want to visit on Google Maps, swipe down to find out if the “Street View” option is available for that particular place. We’ve found that most places will have a street view. Once in street view you’ll find a double arrow icon in the lower right hand side, and double clicking on those arrows will split the screen into a vr format automatically.  3. Google Views Google Views is the direct way to Google Street View with the added option of a homepage that has a curated collection of spectacular photospheres from around the world. You can choose from the highlighted photospheres or search for others. To access this amazing collection of photospheres search for Google Views on your phone web browser and choose a view that has the photosphere icon. Next, swipe down to see the additional information section and click “View on Google Maps”. Once in street view you should be able to follow the same steps outlined above to convert Google Maps street view into a split screen format. 4. VR Cinema VR Cinema is a simple and effective way to view video using Google Cardboard. Although this app isn’t intended to provide full immersive 360 degree environments like photospheres or virtual reality video like AirPano.com, it’s still like having your own private movie theatre. This app plays videos that are stored on the phone, but hopefully in the future these kind of vr video apps will be also be able to play content directly from video sites like YouTube and possibly even stream live video from the web. 5. EON Experience VR EON is a surprisingly in depth little app. EON provides a tantalizing preview of how 3D models can be used in virtual reality for learning. The examples include models of robotics, cell structure, anatomy and many others. With apps like EON content areas like science, medicine, math and engineering could be revolutionized in the classroom by providing interactive manipulatives and simulations. Apps like these can very soon allow us to virtually explore faraway solar systems, the ocean floor, inside molecules and much more.  3D models in virtual reality What does the future hold? Although entertainment apps like games will continue to dominate the vr app market, the potential for educational apps is huge and likely to expand once more students and educators adopt them into their classrooms. The most powerful vr apps yet to be developed and released include an official YouTube virtual reality app or function within the current YouTube app. YouTube is already looking into adding more 360 degree virtual reality video to their collection of online content. Hopefully Google Cultural Institute, which employs the same kind of street view function as Google Maps only inside of world class museums and institutions, will also be updated to include a vr split screen mode too. As mentioned above, virtual reality video isn’t widely available yet, but with vr video cameras like the 360Cam, which aims to make HD virtual reality video an affordable tool for the masses to use, that may all soon be changing. We stand on the cusp of what virtual reality can offer to education and are now beginning to explore how it can empower learning in so many different ways. Wil Codilla is a professional artist, public educator and speaker. @WilCodilla
|

Wil Codilla
Archives
January 2018
Categories |

 RSS Feed
